PHOENIX EOD
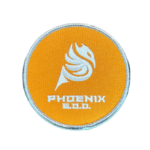
Phoenix E.O.D. Logo Patch
Phoenix E.O.D. Logo Patch
Phoenix Warehouse
404 Bloomfield Drive
Suite 1
Berlin Township NJ 08091
United States
Choose options
Now you can sport your favorite detailing product company on your favorite apparel! Lucky Shirt!? Slap a Phoenix E.O.D. patch on there! Signature hat!? Slap a Phoenix E.O.D. patch on there! You know you want one on your favorite hoodie - WELL NOW YOU CAN!
All patches come with heatseal, also known as iron-on backing, unless otherwise specified. The adhesive is rated for up to 30 washes. For best results, patches should be applied to cotton and/or denim. Be advised that heatseal doesn't play well with nylon or other synthetic fabrics. For a more permanent bond, these embroidered patches can also be glued or sewn onto garments if you prefer.
- 75% embroidered which means that we used a colored canvas background (twill) material
- The logo was sewn in using a needle and thread to create a custom patch
- The Phoenix E.O.D. Logo Patch is unmatched in overall quality and care
IRON-ON EMBROIDERED PATCH INSTRUCTIONS
*for best results, wash your garment before application
1. Set iron to medium-high heat.
Wait a couple of minutes, grab a drink, play some music, and let the iron get nice and hot.
2. Lay garment on hard surface.
By surface, we mean a heat-tolerant surface such as a sturdy table, wooden cutting board, or Mom’s granite countertops. Padded ironing boards will get wrinkles out of your shirt, but won’t work well to adhere your new patch.
3. Place patch face up wherever you’d like.
We’re almost certain you had an idea of where your patch was going to be placed before it arrived, but in case you didn’t, may we recommend:
- Shirts: 7" - 9" down from left shoulder seam, between center and side seam, or 4" - 6" to the right of center. Just don’t go below the armpit.
- Jackets, pants, and shorts: Cluster several patches in one area or iron-on a trail of patches down long sleeves or pant legs. The only way to mess this up is by not having enough patches!
- Hats: Front and center is the most popular location for one of our patches, about 0.5" from the bottom. Our patches that are approximately 3”W x 3”H and are perfect for the front, back, or sides.
- Bags: Go crazy! Just watch out for seams, zippers, handles, or straps.
4. Cover with a piece of fabric.
Use a single layer of fabric, such as a press cloth or cotton bandana. This is to avoid scorching your Phoenix E.O.D. patch. Please don’t skip this step.
5. Apply firm pressure straight down with heated iron for about 45 seconds.
Be sure to apply constant pressure. We know your mind-brain is telling you to iron out the wrinkles, but do not move the iron side-to-side like you normally would. Allow it to cool a little before the next step.
6. Turn the garment inside out and iron the back of the patch for 30 seconds.
No need to cover this side with a piece of fabric. Be sure and apply constant pressure once again.
7. Gently check if backing is adhered to garment. Let garment cool and enjoy your patch!
Allowing the patch time to cool will help set the heat seal backing onto your garment. Simply repeat steps 4-6 if necessary.
Note: Wait 48 hours before washing, and turn garment inside out when doing so.
The heatseal is good for about 30 washes, so get 'er stitched if you're going to be washing it a lot.
Please contact us at info@phoenixeod.com with any questions.

